I’m all about candy. Any type really. Fudge, marshmallows, chewy lollies, jubes – I love them all but marshmallows have always been one of my favourites. I’ve been known to sit with a bag of marshmallows, a skewer and a lit candle and toast my own marshmallows in front of the TV. True story. In fact, I haven’t done it in a while and I’ve just reminded myself to do it again.
Anyway, of course I couldn’t stop at just making Caramallows because, well, I have a hard time reining my ideas in. It felt to me like they would just be perfect with a bit of crunchy cookie and covered in chocolate. Am I right?
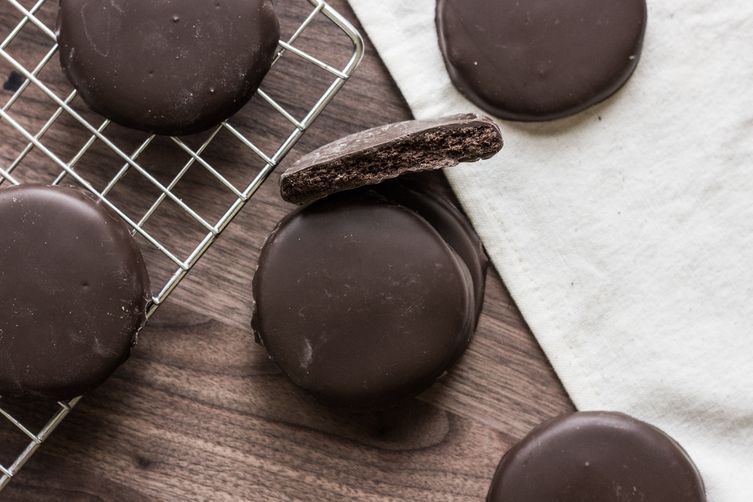
Anyway, Caramel Chocolate Marshmallow Cookie Bars (try and say that three times fast – I dare ya. Haha) are way easier than the name suggests. I love a simple recipe as much as the next person.
The cookie base is a no bake cookie – my favourite kind.
The marshmallows are store-bought, of the giant campfire variety.
The caramel is all homemade and chewy and perfect
Then that chocolate is just, well, melted chocolate.
Report this ad
Plus, anything with marshmallows is so much fun – Raspberry Coconut Marshmallow Slice, Chocolate Marshmallow Brownies and my Giant Homemade Wagon Wheel Slice to name a few. These are fun to put together and fun to eat too.
Save
Caramel tips
Make caramel from scratch doesn’t need to be scary. Read these really important steps to avoid to risk of crystallising your caramel. Crystallisation = Bad.
Report this ad
Do not use a non-stick saucepan – the caramel will crystallise, breaking a little bit of your heart at the same time
Use a stainless steel saucepan that is super clean – If there is any minor trace of grease, the caramel will crystallise, breaking a little bit of your heart at the same time. To be really sure run a cut lemon around the inside to remove any traces of grease and rinse.
Make sure the sugar dissolves fully before bringing it to a boil – if it doesn’t the caramel will crystallise, breaking a little bit of your …. you know the story
While you’re melting the sugar, use a wet pastry brush now and then to dissolve any sugar crystals on the side. If you don’t, the caramel will see those little crystals as a foreign body and crystallise.
Once the sugar comes to a boil leave it alone, don’t touch it until it’s golden brown and you’re ready to add the butter and cream and – tadaaa – caramel.
Click here to pin this recipe for later!
Save
Happy, not baking ?
Report this ad
HAVE YOU TRIED THIS RECIPE?
Rate it below or comment with any questions or thoughts.
GET NEW RECIPES DELIVERED STRAIGHT TO YOUR EMAIL INBOX subscribe here.
In addition to new posts you’ll receive monthly newsletters, and a free ebook. Plus any other freebies I come up with along the way.
{“@context”:”http:\/\/schema.org\/”,”@type”:”Recipe”,”name”:”Caramel Chocolate Marshmallow Cookie Bars”,”author”:{“@type”:”Person”,”name”:”Marie”},”description”:”Caramel Chocolate Marshmallow Cookie Bars \u2013 it may be a long name but these no bake cookie bars, filled with marshmallow, chewy caramel and covered in chocolate deserve it.”,”datePublished”:”2018-07-19T04:30:03+00:00″,”image”:[“https:\/\/i0.wp.com\/www.sugarsaltmagic.com\/wp-content\/uploads\/2018\/07\/Caramel-Chocolate-Marshmallow-Cookie-Bars-2.jpg?fit=680%2C1020&ssl=1″,”https:\/\/i0.wp.com\/www.sugarsaltmagic.com\/wp-content\/uploads\/2018\/07\/Caramel-Chocolate-Marshmallow-Cookie-Bars-2.jpg?resize=500%2C500&ssl=1″,”https:\/\/i0.wp.com\/www.sugarsaltmagic.com\/wp-content\/uploads\/2018\/07\/Caramel-Chocolate-Marshmallow-Cookie-Bars-2.jpg?resize=500%2C375&ssl=1″,”https:\/\/i0.wp.com\/www.sugarsaltmagic.com\/wp-content\/uploads\/2018\/07\/Caramel-Chocolate-Marshmallow-Cookie-Bars-2.jpg?resize=480%2C270&ssl=1″],”recipeYield”:”16 pieces”,”prepTime”:”PT10M”,”cookTime”:”PT20M”,”totalTime”:”PT30M”,”recipeIngredient”:[“250 g (8.8oz) digestive biscuits or similar (I use Arnotts granita)”,”100 g (3.5oz) unsalted butter, melted”,”280 g (9.8oz) vanilla marshmallows ((notes))”,”300 g (1 1\/2 cups \/ 10.5oz) white sugar”,”1\/3 cup water”,”113 g (1\/2 cup \/ 1 stick) unsalted butter”,”1\/2 cup thickened or heavy cream”,”300 g (10.5oz) milk chocolate”],”recipeInstructions”:[{“@type”:”HowToSection”,”name”:”For the base”,”itemListElement”:[{“@type”:”HowToStep”,”text”:”Grease and line a 6cm deep, 22cm square brownie tin with baking paper.”},{“@type”:”HowToStep”,”text”:”Blitz the biscuits to crumbs in a food processor. Add the melted butter and mix well. Press the mixture into the base of the prepared tin.”}]},{“@type”:”HowToSection”,”name”:”To make the caramel”,”itemListElement”:[{“@type”:”HowToStep”,”text”:”Using a heavy based saucepan over very low heat, dissolve the sugar into the water while gently stirring. Make sure not to splash sugar up the sides of the pan. If you do, just use a clean pastry brush with a little water to dissolve it.”},{“@type”:”HowToStep”,”text”:”Once the sugar has dissolved completely, stop stirring, remove the spoon, turn the heat up to medium-low and bring the mixture to a slow boil. Let it boil for roughly 10-15 minutes until the syrup turns a deep amber colour.”},{“@type”:”HowToStep”,”text”:”Add the butter and stir until melted.”},{“@type”:”HowToStep”,”text”:”Now add the cream and stir well.”},{“@type”:”HowToStep”,”text”:”Bring the caramel back to a boil for around 6-7 minutes, stirring every so often until the mixture thickens and is a dark golden brown colour.”},{“@type”:”HowToStep”,”text”:”Drizzle a little of the caramel over the biscuit base, then place the marshmallows over the top, pressing them quite close together.”},{“@type”:”HowToStep”,”text”:”Pour the remaining caramel over the top allowing it to drizzle down into the gaps. Place in the fridge for at least 1\/2 an hour before proceeding.”}]},{“@type”:”HowToSection”,”name”:”For the topping”,”itemListElement”:[{“@type”:”HowToStep”,”text”:”Melt the chocolate in 30 second increments, stirring well between each burst until it is just melted.”},{“@type”:”HowToStep”,”text”:”Pour the melted chocolate over the top and spread out evenly. Place in the fridge until set.”}]}],”recipeCategory”:[“Dessert”,”Snack”,”Sweets”],”aggregateRating”:{“@type”:”AggregateRating”,”ratingValue”:”5″,”ratingCount”:”1″}}
Save
5 from 1 vote
Caramel Chocolate Marshmallow Cookie Bars
Caramel Chocolate Marshmallow Cookie Bars – it may be a long name but these no bake cookie bars, filled with marshmallow, chewy caramel and covered in chocolate deserve it.
Course Dessert, Snack, Sweets
Prep Time 10 minutes
Cook Time 20 minutes
Setting time 2 hours
Total Time 30 minutes
Servings 16 pieces
Author Marie
Ingredients
The base
250 g (8.8oz) digestive biscuits or similar (I use Arnotts granita)
100 g (3.5oz) unsalted butter, melted
280 g (9.8oz) vanilla marshmallows (notes)
For the caramel
300 g (1 1/2 cups / 10.5oz) white sugar
1/3 cup water
113 g (1/2 cup / 1 stick) unsalted butter
1/2 cup thickened or heavy cream
Topping
300 g (10.5oz) milk chocolate
Instructions
For the base
Grease and line a 6cm deep, 22cm square brownie tin with baking paper.
Blitz the biscuits to crumbs in a food processor. Add the melted butter and mix well. Press the mixture into the base of the prepared tin.
To make the caramel
Using a heavy based saucepan over very low heat, dissolve the sugar into the water while gently stirring. Make sure not to splash sugar up the sides of the pan. If you do, just use a clean pastry brush with a little water to dissolve it.
Once the sugar has dissolved completely, stop stirring, remove the spoon, turn the heat up to medium-low and bring the mixture to a slow boil. Let it boil for roughly 10-15 minutes until the syrup turns a deep amber colour.
Add the butter and stir until melted.
Now add the cream and stir well.
Bring the caramel back to a boil for around 6-7 minutes, stirring every so often until the mixture thickens and is a dark golden brown colour.
Drizzle a little of the caramel over the biscuit base, then place the marshmallows over the top, pressing them quite close together.
Pour the remaining caramel over the top allowing it to drizzle down into the gaps. Place in the fridge for at least 1/2 an hour before proceeding.
For the topping
Melt the chocolate in 30 second increments, stirring well between each burst until it is just melted.
Pour the melted chocolate over the top and spread out evenly. Place in the fridge until set.
Recipe Notes
I use giant campfire marshmallows cut in half but you can use smaller sized marshmallows and not cut them.
Caramel Chocolate Marshmallow Cookie Bars
Caramel Chocolate Marshmallow Cookie Bars – it may be a long name but these no bake cookie bars, filled with marshmallow, chewy caramel and covered in chocolate deserve it.Course Dessert, Snack, Sweets Prep Time 10 minutes Cook Time 20 minutes Setting time 2 hours Total Time 30 minutes Servings16 pieces Author Marie
Ingredients
The base
- 250 g (8.8oz) digestive biscuits or similar (I use Arnotts granita)
- 100 g (3.5oz) unsalted butter, melted
- 280 g (9.8oz) vanilla marshmallows (notes)
For the caramel
- 300 g (1 1/2 cups / 10.5oz) white sugar
- 1/3 cup water
- 113 g (1/2 cup / 1 stick) unsalted butter
- 1/2 cup thickened or heavy cream
Topping
- 300 g (10.5oz) milk chocolate
Instructions
For the base
- Grease and line a 6cm deep, 22cm square brownie tin with baking paper.
- Blitz the biscuits to crumbs in a food processor. Add the melted butter and mix well. Press the mixture into the base of the prepared tin.
To make the caramel
- Using a heavy based saucepan over very low heat, dissolve the sugar into the water while gently stirring. Make sure not to splash sugar up the sides of the pan. If you do, just use a clean pastry brush with a little water to dissolve it.
- Once the sugar has dissolved completely, stop stirring, remove the spoon, turn the heat up to medium-low and bring the mixture to a slow boil. Let it boil for roughly 10-15 minutes until the syrup turns a deep amber colour.
- Add the butter and stir until melted.
- Now add the cream and stir well.
- Bring the caramel back to a boil for around 6-7 minutes, stirring every so often until the mixture thickens and is a dark golden brown colour.
- Drizzle a little of the caramel over the biscuit base, then place the marshmallows over the top, pressing them quite close together.
- Pour the remaining caramel over the top allowing it to drizzle down into the gaps. Place in the fridge for at least 1/2 an hour before proceeding.
For the topping
- Melt the chocolate in 30 second increments, stirring well between each burst until it is just melted.
- Pour the melted chocolate over the top and spread out evenly. Place in the fridge until set.
Recipe Notes
- I use giant campfire marshmallows cut in half but you can use smaller sized marshmallows and not cut them.