Red Beans and Rice

Cooks Illustrated-  very good 8/10

Red Beans and Rice

Why This Recipe Works
To replicate this traditional red beans and rice recipe from New Orleans using ingredients easily found in supermarkets across the country, we made some simple substitutions: small red beans for Camellia-brand dried red beans and bacon for hard-to-find tasso. Fine-tuning the proportions of sautéed green peppers, onions, and celery gave the recipe balance, and the right ratio of chicken broth to water added complexity without giving the dish an overpowering chicken flavor.

  • Table salt
  • 1 pound small red beans (about 2 cups), rinsed and picked over
    4 slices bacon (about 4 ounces), chopped fine (see note) (I used 6oz turkey bacon)
    1 medium onion, chopped fine (about 1 cup)
    1 small green bell pepper, seeded and chopped fine (about 1/2 cup)
    1 celery rib, chopped fine (about 1/2 cup)
    3 medium garlic cloves, minced or pressed through garlic press (about 1 tablespoon)
    1 teaspoon fresh thyme leaves
    1 teaspoon sweet paprika (see note)
    2 bay leaves
    ¼ teaspoon cayenne pepper
  • Ground black pepper
    3 cups low-sodium chicken broth
    6 cups water
    8 ounces andouille sausage, halved lengthwise and cut into 1/4-inch slices (see note) (I used turkey andouille)
  • Basic White Rice (see related recipe)
    1 teaspoon red wine vinegar, plus extra for seasoning
    3 scallions, white and green parts, sliced thin
  • Hot sauce (optional)

Instructions
Serves 6 to 8
If you are pressed for time you can “quick-brine” your beans. In step 1, combine the salt, water, and beans in a large Dutch oven and bring to a boil over high heat. Remove the pot from the heat, cover, and let stand 1 hour. Drain and rinse the beans and proceed with the recipe. If you can’t find andouille sausage, substitute kielbasa. Tasso can be difficult to find, but if you use it, omit the bacon and paprika in step 2 and cook 4 ounces finely chopped tasso in 2 teaspoons vegetable oil until lightly browned, 4 to 6 minutes, then proceed with the recipe. In order for the starch from the beans to thicken the cooking liquid, it is important to maintain a vigorous simmer in step 2. The beans can be cooled, covered tightly, and refrigerated for up to 2 days. To reheat, add enough water to the beans to thin them slightly.
1. Dissolve 3 tablespoons salt in 4 quarts cold water in large bowl or container. Add beans and soak at room temperature for at least 8 hours and up to 24 hours. Drain and rinse well.

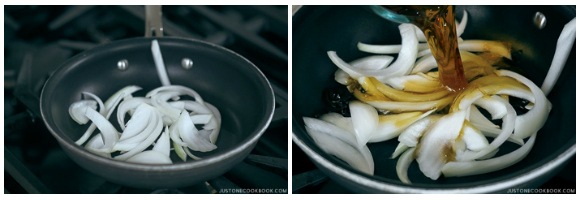
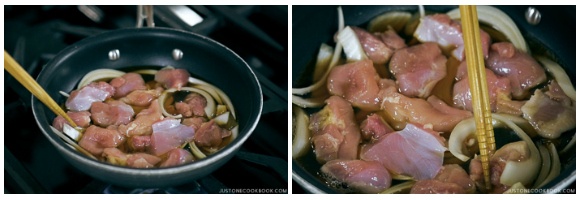
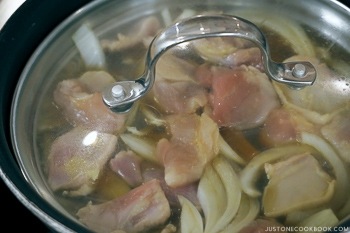
2. Heat bacon in large Dutch oven over medium heat, stirring occasionally, until browned and almost fully rendered, 5 to 8 minutes. Add onion, green pepper, and celery; cook, stirring frequently, until vegetables are softened, 6 to 7 minutes. Stir in garlic, thyme, paprika, bay leaves, cayenne pepper, and 1/4 teaspoon black pepper; cook until fragrant, about 30 seconds. Stir in beans, broth, and water; bring to boil over high heat. Reduce heat and vigorously simmer, stirring occasionally, until beans are just soft and liquid begins to thicken, 45 to 60 minutes.

3. Stir in sausage and 1 teaspoon red wine vinegar and cook until liquid is thick and beans are fully tender and creamy, about 30 minutes. Season to taste with salt, black pepper, and additional red wine vinegar. Serve over rice, sprinkling with scallions and passing hot sauce separately, if desired.
Keys to Better Red Beans

THE RIGHT BEANS
Small red beans cooked up creamier than kidney beans and were easier to find than the authentic Camellia beans.

OVERNIGHT BRINE
Salting the dried beans during their overnight rehydration session kept them well seasoned and smooth-textured.

ACID REDUX
Adding red wine vinegar at two different points during the cooking process provided all the bright acidity of traditional “pickle meat”

Cheesy Shrimp Tacos

Encamaronadas

 (Loren’s recipe)
From Season 9, Mexico—One Plate at a Time
Servings: 15 tacos

INGREDIENTS

  • 12ounces (2 medium-small round or 4 or 5 plum) ripe tomatoes, cut into ¼-inch pieces
  • Fresh serrano chiles to taste, (roughly 3 to 5), or even more if you like it really picante), stemmed, seeded if you wish, and finely chopped
  • 1/4cup chopped cilantro, thick bottom stems removed
  • 1large garlic clove, peeled and very finely chopped
  • 1small white onion, finely chopped
  • 1tablespoon Mexican hot sauce (such as Valentina or Tamazula), plus extra for serving
  • 1tablespoon ketchup
  • 2teaspoons fresh lime juice (optional, but you might like the zing it adds)
  • Salt
  • About 1/3cup vegetable oil, divided use
  • 1pound small shrimp, peeled, deveined if you wish, and chopped into pieces a little smaller than ½ inch
  • 15 corn tortillas
  • 8ounces shredded Mexican melting cheese (full-flavored Chihuahua or Jack cheese work best)

INSTRUCTIONS

Making the” salsa. Scoop the tomatoes, chiles, cilantro, garlic and white onion into a bowl and mix well. Stir in the hot sauce, ketchup and optional lime juice. Taste and season with salt, usually about a scant teaspoon.

Making the shrimp filling. Heat a very large (12-inch), heavy skillet—nonstick works really well—over medium-high. Pour in 2 tablespoons of the oil and when it is hot, add the “salsa” vegetables. Cook, stirring regularly, until everything softens together, about 5 minutes. Scoop in the shrimp and stir until they are barely cooked through (they can still be slightly translucent at the center)—about 3 minutes. Scoop the shrimp mixture into a bowl, wash and dry the skillet, and return it to medium heat.

Assembling the encamaronadas. Heavily film the bottom of the skillet with oil. When hot, lay in a tortilla. After a few seconds, flip it, then scatter a couple of tablespoons of shredded cheese over one side, top with a generous tablespoon of the filling. Use tongs to fold the uncovered part of the tortilla over the filling, forming a turnover. Gently press flat. Continue to make encamaronadas in the same fashion until the skillet is full, frying them until crisp—2 to 3 minutes per side. As they become crisp, remove them to a plate lined with paper towels. Serve right away with more Mexican hot sauce.

Oyakodon (Chicken & Egg Bowl)

Oyakodon (Chicken & Egg Bowl) 親子丼 | Easy Japanese Recipes at JustOneCookbook.com
Print
Prep Time 15 mins
Cook Time 15 mins
Total Time 30 mins
Course: Main Course
Servings: 2
Ingredients
  • 2 boneless skinless chicken thighs
  • ½ onion
  • 2 large eggs
Seasonings (ample amount – do not need to use all): (I used all)
To serve:
Instructions
  1. Gather all the ingredients.
    Oyakodon Ingredients
  2. Combine dashi, mirin, sake, soy sauce in a bowl or a liquid measuring cup.
    Oyakodon 1
  3. Add sugar and mix all together until sugar is dissolved.
    Oyakodon 2
  4. Thinly slice the onion and chop mitsuba (or green onion). Beat one egg in a small bowl (you will need to beat another egg when you work on the second batch).
    Oyakodon 3
  5. Slice the chicken thigh diagonally and cut into 1.5″ (4 cm) pieces. I recommend using “sogigiri” cutting technique so the chicken will be equal thickness and create more surface area for fast cooking.
    Oyakodon 4
  6. We make one serving at a time using a small frying pan. Divide all the ingredients in half. Add half of the onion in a single layer.  Pour roughly 1/3 to ½ of the seasonings mixture (depending on the size of your frying pan, the amount may vary). You will need just enough sauce to cover the onion and chicken.
    Oyakodon 5
  7. Add half of the chicken on top of the onion. Make sure the onion and chicken are evenly distributed.  Turn on the heat to medium heat and bring to a boil.

    Oyakodon 6
  8. Once boiling, lower the heat to medium low heat. Skim off any foam or scum if you see any. Cover and cook for about 5 minutes or until chicken is no longer pink.

    Oyakodon 7
  9. Slowly and evenly drizzle the beaten egg over the chicken and onion. Cook covered on medium low heat until the egg is done to your liking. Usually Oyakdon in Japan is served with almost set but runny egg.

    Oyakodon 8
  10. Add the mitsuba (or green onion) right before removing from the heat. Pour the chicken and egg on top of steamed rice and drizzle desired amount of remaining sauce.
    Oyakodon 9