Grinch Cookies

Notes

Recipe taken from TastyEverAfter.com

Serving size is 1 cookie

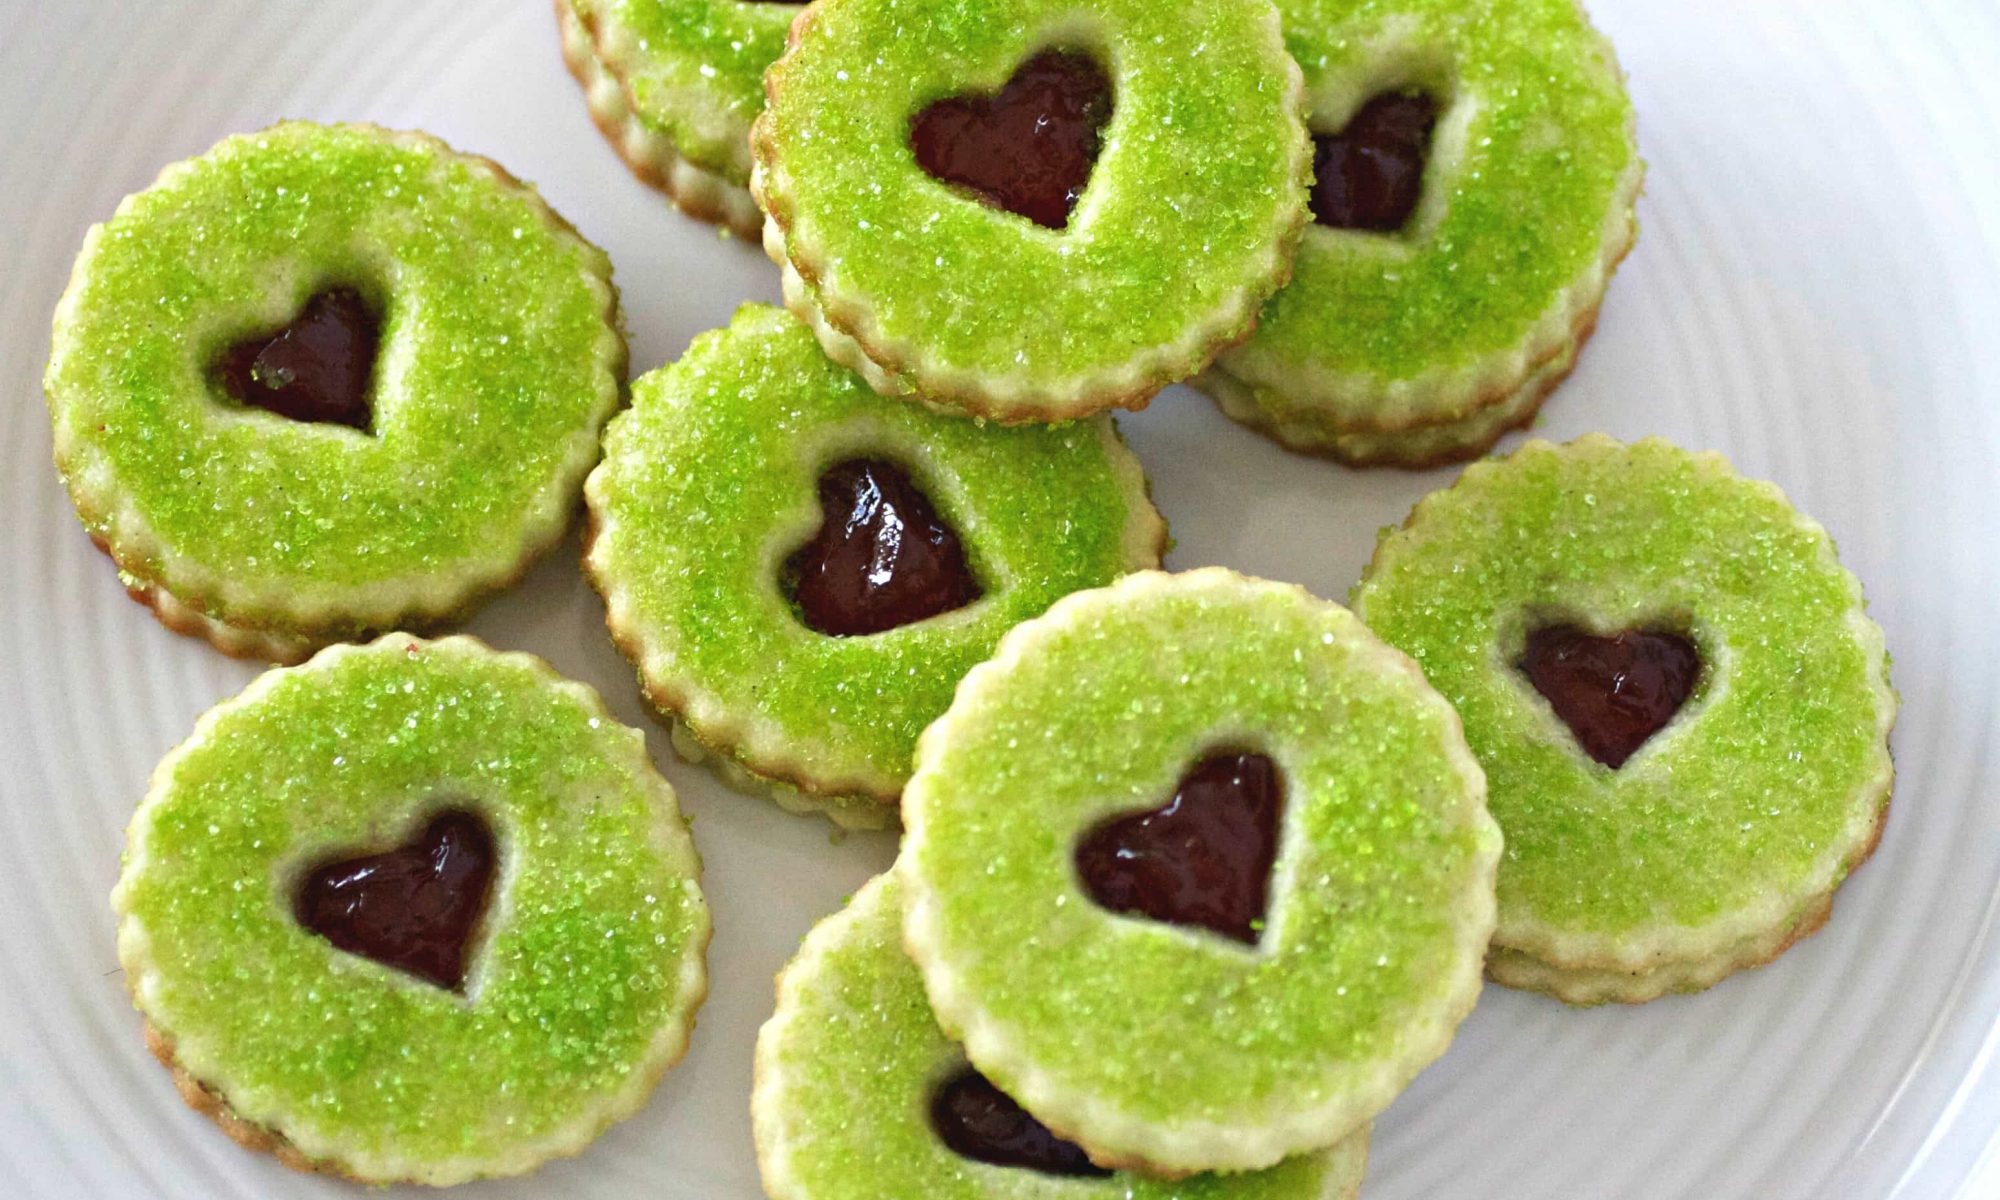
These raspberry filled Grinch Cookies are perfect for Christmas and so easy to make with an easy homemade sugar cookie dough. Can use store bought dough for a time saver!

If you don’t have a heart cookie cutter, use a small paring knife to make the heart shaped center of the cookie.

Store leftover baked and filled cookies in the refrigerator for up to 5 days in tightly covered container.

Unfilled cookies can be frozen for up to 2 months after baking in a freezer proof container or bag.

Ingredients

  • 1 cup unsalted butter , softened
  • 1 cup sugar
  • 1 pinch salt
  • 1 egg , at room temperature
  • 1 ½ teaspoon vanilla extract
  • 3–4 drops green food coloring
  • 2 ½ cups all-purpose flour
  • ¾ cup all-natural seedless raspberry preserves, jam, or jelly
  • green sugar sprinkles

Instructions

  1. Place butter, sugar, and salt in a large bowl. Using a stand-up mixer with a paddle attachment or a handheld mixer, cream ingredients together at medium speed until light and fluffy (about 4 minutes).
  2. Scrape down sides, add egg and vanilla, Beat for another 2–3 minutes, scraping down sides as necessary, until well combined. Add 3–4 drops of green food coloring and mix for another minute or until the green coloring is evenly distributed throughout dough and there are no streaks of color.
  3. Slowly add flour, ½ cup at a time, mixing well after each addition. Dough should be firm, not sticky, but still be soft. Divide dough in half and put each half between two pieces of heavy-duty freezer plastic wrap or parchment paper. Roll each piece of dough to ¼″ thick and place in refrigerator on flat surface for at least 30 minutes.
  4. Preheat oven to 350°F degrees. Line baking sheets with parchment paper or use a silicone baking mat.
  5. Remove one prepared dough sheet at a time from refrigerator. Remove top layer of parchment paper or plastic wrap and cut out 30 cookies using a round shaped cutter with a heart insert. Place on baking sheet and coat the top of each cookie with green sprinkles, if using. Take out other cookie dough sheet and cut out 30 cookies using just a round shaped cutter. Place on baking sheet.
  6. Bake 8–10 minutes, or until lightly brown on edges. Let cool for minute or two on baking sheet, then transfer to wire rack to cool.
  7. When cookies are completely cooled, take the round cookies and spread a little of the raspberry preserves on each one. At this point, if you haven’t used the green sprinkles, sift powdered sugar on top of each heart cut-out cookie. Lightly press it on top of jelled cookie.

Caramel Chocolate Marshmallow Cookie Bars

https://www.sugarsaltmagic.com/caramel-chocolate-marshmallow-cookie-bars/

I’m all about candy. Any type really. Fudge, marshmallows, chewy lollies, jubes – I love them all but marshmallows have always been one of my favourites. I’ve been known to sit with a bag of marshmallows, a skewer and a lit candle and toast my own marshmallows in front of the TV. True story. In fact, I haven’t done it in a while and I’ve just reminded myself to do it again.

Anyway, of course I couldn’t stop at just making Caramallows because, well, I have a hard time reining my ideas in. It felt to me like they would just be perfect with a bit of crunchy cookie and covered in chocolate. Am I right?


Anyway, Caramel Chocolate Marshmallow Cookie Bars (try and say that three times fast – I dare ya. Haha) are way easier than the name suggests. I love a simple recipe as much as the next person.
The cookie base is a no bake cookie – my favourite kind.
The marshmallows are store-bought, of the giant campfire variety.
The caramel is all homemade and chewy and perfect
Then that chocolate is just, well, melted chocolate.

Report this ad

Plus, anything with marshmallows is so much fun – Raspberry Coconut Marshmallow Slice, Chocolate Marshmallow Brownies and my Giant Homemade Wagon Wheel Slice to name a few. These are fun to put together and fun to eat too.


Save

Caramel tips
Make caramel from scratch doesn’t need to be scary. Read these really important steps to avoid to risk of crystallising your caramel. Crystallisation = Bad.

Report this ad

Do not use a non-stick saucepan – the caramel will crystallise, breaking a little bit of your heart at the same time
Use a stainless steel saucepan that is super clean – If there is any minor trace of grease, the caramel will crystallise, breaking a little bit of your heart at the same time. To be really sure run a cut lemon around the inside to remove any traces of grease and rinse.
Make sure the sugar dissolves fully before bringing it to a boil – if it doesn’t the caramel will crystallise, breaking a little bit of your …. you know the story
While you’re melting the sugar, use a wet pastry brush now and then to dissolve any sugar crystals on the side. If you don’t, the caramel will see those little crystals as a foreign body and crystallise.
Once the sugar comes to a boil leave it alone, don’t touch it until it’s golden brown and you’re ready to add the butter and cream and – tadaaa – caramel.
Click here to pin this recipe for later!


Save

Happy, not baking ?

Report this ad


HAVE YOU TRIED THIS RECIPE?
Rate it below or comment with any questions or thoughts.

GET NEW RECIPES DELIVERED STRAIGHT TO YOUR EMAIL INBOX subscribe here.
In addition to new posts you’ll receive monthly newsletters, and a free ebook. Plus any other freebies I come up with along the way.


{“@context”:”http:\/\/schema.org\/”,”@type”:”Recipe”,”name”:”Caramel Chocolate Marshmallow Cookie Bars”,”author”:{“@type”:”Person”,”name”:”Marie”},”description”:”Caramel Chocolate Marshmallow Cookie Bars \u2013 it may be a long name but these no bake cookie bars, filled with marshmallow, chewy caramel and covered in chocolate deserve it.”,”datePublished”:”2018-07-19T04:30:03+00:00″,”image”:[“https:\/\/i0.wp.com\/www.sugarsaltmagic.com\/wp-content\/uploads\/2018\/07\/Caramel-Chocolate-Marshmallow-Cookie-Bars-2.jpg?fit=680%2C1020&ssl=1″,”https:\/\/i0.wp.com\/www.sugarsaltmagic.com\/wp-content\/uploads\/2018\/07\/Caramel-Chocolate-Marshmallow-Cookie-Bars-2.jpg?resize=500%2C500&ssl=1″,”https:\/\/i0.wp.com\/www.sugarsaltmagic.com\/wp-content\/uploads\/2018\/07\/Caramel-Chocolate-Marshmallow-Cookie-Bars-2.jpg?resize=500%2C375&ssl=1″,”https:\/\/i0.wp.com\/www.sugarsaltmagic.com\/wp-content\/uploads\/2018\/07\/Caramel-Chocolate-Marshmallow-Cookie-Bars-2.jpg?resize=480%2C270&ssl=1″],”recipeYield”:”16 pieces”,”prepTime”:”PT10M”,”cookTime”:”PT20M”,”totalTime”:”PT30M”,”recipeIngredient”:[“250 g (8.8oz) digestive biscuits or similar (I use Arnotts granita)”,”100 g (3.5oz) unsalted butter, melted”,”280 g (9.8oz) vanilla marshmallows ((notes))”,”300 g (1 1\/2 cups \/ 10.5oz) white sugar”,”1\/3 cup water”,”113 g (1\/2 cup \/ 1 stick) unsalted butter”,”1\/2 cup thickened or heavy cream”,”300 g (10.5oz) milk chocolate”],”recipeInstructions”:[{“@type”:”HowToSection”,”name”:”For the base”,”itemListElement”:[{“@type”:”HowToStep”,”text”:”Grease and line a 6cm deep, 22cm square brownie tin with baking paper.”},{“@type”:”HowToStep”,”text”:”Blitz the biscuits to crumbs in a food processor. Add the melted butter and mix well. Press the mixture into the base of the prepared tin.”}]},{“@type”:”HowToSection”,”name”:”To make the caramel”,”itemListElement”:[{“@type”:”HowToStep”,”text”:”Using a heavy based saucepan over very low heat, dissolve the sugar into the water while gently stirring. Make sure not to splash sugar up the sides of the pan. If you do, just use a clean pastry brush with a little water to dissolve it.”},{“@type”:”HowToStep”,”text”:”Once the sugar has dissolved completely, stop stirring, remove the spoon, turn the heat up to medium-low and bring the mixture to a slow boil. Let it boil for roughly 10-15 minutes until the syrup turns a deep amber colour.”},{“@type”:”HowToStep”,”text”:”Add the butter and stir until melted.”},{“@type”:”HowToStep”,”text”:”Now add the cream and stir well.”},{“@type”:”HowToStep”,”text”:”Bring the caramel back to a boil for around 6-7 minutes, stirring every so often until the mixture thickens and is a dark golden brown colour.”},{“@type”:”HowToStep”,”text”:”Drizzle a little of the caramel over the biscuit base, then place the marshmallows over the top, pressing them quite close together.”},{“@type”:”HowToStep”,”text”:”Pour the remaining caramel over the top allowing it to drizzle down into the gaps. Place in the fridge for at least 1\/2 an hour before proceeding.”}]},{“@type”:”HowToSection”,”name”:”For the topping”,”itemListElement”:[{“@type”:”HowToStep”,”text”:”Melt the chocolate in 30 second increments, stirring well between each burst until it is just melted.”},{“@type”:”HowToStep”,”text”:”Pour the melted chocolate over the top and spread out evenly. Place in the fridge until set.”}]}],”recipeCategory”:[“Dessert”,”Snack”,”Sweets”],”aggregateRating”:{“@type”:”AggregateRating”,”ratingValue”:”5″,”ratingCount”:”1″}}

Save
5 from 1 vote
Print
Caramel Chocolate Marshmallow Cookie Bars
Caramel Chocolate Marshmallow Cookie Bars – it may be a long name but these no bake cookie bars, filled with marshmallow, chewy caramel and covered in chocolate deserve it.
Course Dessert, Snack, Sweets

Prep Time 10 minutes


Cook Time 20 minutes
Setting time 2 hours
Total Time 30 minutes

Servings 16 pieces

Author Marie

Ingredients
The base
250 g (8.8oz) digestive biscuits or similar (I use Arnotts granita)
100 g (3.5oz) unsalted butter, melted
280 g (9.8oz) vanilla marshmallows (notes)
For the caramel
300 g (1 1/2 cups / 10.5oz) white sugar
1/3 cup water
113 g (1/2 cup / 1 stick) unsalted butter
1/2 cup thickened or heavy cream
Topping
300 g (10.5oz) milk chocolate
Instructions
For the base
Grease and line a 6cm deep, 22cm square brownie tin with baking paper.
Blitz the biscuits to crumbs in a food processor. Add the melted butter and mix well. Press the mixture into the base of the prepared tin.
To make the caramel
Using a heavy based saucepan over very low heat, dissolve the sugar into the water while gently stirring. Make sure not to splash sugar up the sides of the pan. If you do, just use a clean pastry brush with a little water to dissolve it.
Once the sugar has dissolved completely, stop stirring, remove the spoon, turn the heat up to medium-low and bring the mixture to a slow boil. Let it boil for roughly 10-15 minutes until the syrup turns a deep amber colour.
Add the butter and stir until melted.
Now add the cream and stir well.
Bring the caramel back to a boil for around 6-7 minutes, stirring every so often until the mixture thickens and is a dark golden brown colour.
Drizzle a little of the caramel over the biscuit base, then place the marshmallows over the top, pressing them quite close together.
Pour the remaining caramel over the top allowing it to drizzle down into the gaps. Place in the fridge for at least 1/2 an hour before proceeding.
For the topping
Melt the chocolate in 30 second increments, stirring well between each burst until it is just melted.
Pour the melted chocolate over the top and spread out evenly. Place in the fridge until set.
Recipe Notes
I use giant campfire marshmallows cut in half but you can use smaller sized marshmallows and not cut them.

Caramel Chocolate Marshmallow Cookie Bars

Caramel Chocolate Marshmallow Cookie Bars – it may be a long name but these no bake cookie bars, filled with marshmallow, chewy caramel and covered in chocolate deserve it.Course Dessert, Snack, Sweets Prep Time 10 minutes Cook Time 20 minutes Setting time 2 hours Total Time 30 minutes Servings16 pieces Author Marie 

Ingredients

The base

  • 250 g (8.8oz) digestive biscuits or similar (I use Arnotts granita)
  • 100 g (3.5oz) unsalted butter, melted
  • 280 g (9.8oz) vanilla marshmallows (notes)

For the caramel

  • 300 g (1 1/2 cups / 10.5oz) white sugar
  • 1/3 cup water
  • 113 g (1/2 cup / 1 stick) unsalted butter
  • 1/2 cup thickened or heavy cream

Topping

  • 300 g (10.5oz) milk chocolate

Instructions

For the base

  1. Grease and line a 6cm deep, 22cm square brownie tin with baking paper.
  2. Blitz the biscuits to crumbs in a food processor. Add the melted butter and mix well. Press the mixture into the base of the prepared tin.

To make the caramel

  1. Using a heavy based saucepan over very low heat, dissolve the sugar into the water while gently stirring. Make sure not to splash sugar up the sides of the pan. If you do, just use a clean pastry brush with a little water to dissolve it.
  2. Once the sugar has dissolved completely, stop stirring, remove the spoon, turn the heat up to medium-low and bring the mixture to a slow boil. Let it boil for roughly 10-15 minutes until the syrup turns a deep amber colour.
  3. Add the butter and stir until melted.
  4. Now add the cream and stir well.
  5. Bring the caramel back to a boil for around 6-7 minutes, stirring every so often until the mixture thickens and is a dark golden brown colour.
  6. Drizzle a little of the caramel over the biscuit base, then place the marshmallows over the top, pressing them quite close together.
  7. Pour the remaining caramel over the top allowing it to drizzle down into the gaps. Place in the fridge for at least 1/2 an hour before proceeding.

For the topping

  1. Melt the chocolate in 30 second increments, stirring well between each burst until it is just melted.
  2. Pour the melted chocolate over the top and spread out evenly. Place in the fridge until set.

Recipe Notes

  1. I use giant campfire marshmallows cut in half but you can use smaller sized marshmallows and not cut them.

Belgian Spice Cookies (Speculoos) with Almonds

I didn’t think this was great, it was like biscotti but not as good.
Published September 2018

Speculoos are Belgian cookies with a crisp, light, open-crumbed texture and a blend of caramelized sugar and warm spice flavors. To achieve the appropriate texture, we rolled the dough thin so it would bake up dry and crisp, used only enough sugar to lightly sweeten the dough since sugar is hygroscopic and makes cookies moist, and added baking powder along with the usual baking soda to produce an open, airy crumb. For a subtle caramel taste, we chose turbinado sugar rather than molasses-based brown sugar or traditional (but hard-to-find) Belgian brown sugar. To nail the spice flavor, we used a large amount of cinnamon along with small amounts of cardamom and cloves for complexity.

INGREDIENTS


  • 1½                cups (7½ ounces) all-purpose flour
  • 5                   teaspoons ground cinnamon
  • 1                   teaspoon ground cardamom
  • ¼                  teaspoon ground cloves
  • ¼                  teaspoon baking soda                                                                                             ¼                  teaspoon baking powder
  • ¼                  teaspoon salt
  • ¾                  cup (6 ounces) turbinado sugar
  • 8                   tablespoons unsalted butter, cut into ½-inch pieces and chilled
  • 1                   large egg
  • ½             cup sliced almonds

INSTRUCTIONS

MAKES 32 COOKIES

For the proper flavor, we strongly recommend using turbinado sugar (commonly sold as Sugar in the Raw). If you can’t find it, use ¾ cup plus 2 tablespoons (6 ounces) of packed light brown sugar and skip the sugar grinding in step 2. In step 3, use a rolling pin and a combination of rolling and a smearing motion to form a rectangle. If the dough spreads beyond the rectangle, trim it and use the scraps to fill in the corners; then, replace the parchment and continue to roll. Do not use cookie molds or an embossed rolling pin for the speculoos; they will not hold decorations.

1. Whisk flour, cinnamon, cardamom, cloves, baking soda, baking powder, and salt together in bowl. Using pencil and ruler, draw 10 by 12-inch rectangle in center of each of 2 large sheets of parchment paper, crisscrossing lines at corners. (Use crisscrosses to help line up top and bottom sheets as dough is rolled.)

2. Process sugar in food processor for 30 seconds (some grains will be smaller than granulated sugar; others will be larger). Add butter and process until uniform mass forms and no large pieces of butter are visible, about 30 seconds, scraping down sides of bowl as needed. Add egg and process until smooth and paste-like, about 10 seconds, scraping down sides of bowl as needed. Add flour mixture and process until no dry flour remains but mixture remains crumbly, about 30 seconds, scraping down sides of bowl as needed.

3. Transfer dough to bowl and knead gently with spatula until uniform and smooth, about 10 seconds. Place 1 piece of parchment on counter with pencil side facing down (you should be able to see rectangle through paper). Place dough in center of marked rectangle and press into 6 by 9-inch rectangle. Place second sheet of parchment over dough, with pencil side facing up, so dough is in center of marked rectangle. Using pencil marks as guide, use rolling pin and bench scraper to shape dough into 10 by 12-inch rectangle of even ⅜-inch thickness. Gently peel off top layer of parchment. Sprinkle almonds evenly over surface of dough. Using rolling pin, gently press almonds into dough. Return parchment to dough. Flip dough so almonds face down and transfer dough with parchment to rimmed baking sheet. Refrigerate until dough is firm, at least 1½ hours (or freeze for 30 minutes). (Rolled dough can be wrapped in plastic wrap and refrigerated for up to 5 days.)

4. Adjust oven racks to upper-middle and lower-middle positions and heat oven to 300 degrees. Line 2 rimless baking sheets with parchment. Transfer chilled dough to counter. Gently peel off top layer of parchment from dough. Using fluted pastry wheel (or sharp knife or pizza cutter) and ruler, trim off rounded edges of dough that extend over marked edges of 10 by 12-inch rectangle. Cut dough lengthwise into 8 equal strips about 1¼ inches wide. Cut each strip crosswise into 4 equal pieces about 3 inches long. Transfer cookies to prepared sheets, spacing them at least ½ inch apart. Bake until cookies are lightly and evenly browned, 30 to 32 minutes, switching and rotating sheets halfway through baking. Let cookies cool completely on sheets, about 20 minutes. (Cookies can be stored at room temperature for up to 3 weeks.)