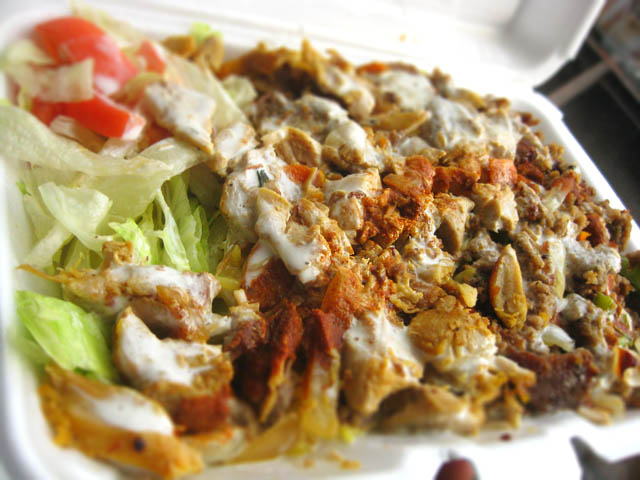
Halal Chicken on a Pita

Based on: Chicken and Rice NYC Street Meat Style by Eric Rhee and Michelle Won

Notes

Rafiqi’s Delicious Food carts are numerous and abundant in NYC. The delicious odor of garlic and middle-eastern herbs permeated my afternoon commute one day back in 2004 and I’ve been a Rafiqi’s addict ever since.

Rafiqi’s chicken is spicy, it’s tender, it’s packed with flavor, and best of all- it tastes exactly like that amazing smell which drew me in- enticing me to wait on a very long line on a scorching, muggy day back in 2004.

I had a rather successful attempt at recreating the chicken on a pita back in 2006, however the times I’ve tried since then didn’t work out so well. While the chicken was yummy, it didn’t have the depth of flavor you get at Rafiqi’s. I nailed the white sauce though, and that is the cornerstone of the meal!

*updates in red

Chicken Halal

Ingredients

  • 6 chicken thighs, fat trimmed, cubed (you can use bone-in, but boneless will be easier to work with)
  • 3 garlic cloves, minced
  • 2 Tbsp lemon juice
  • 1 Tbsp Oregano
  • 2 tsp paprika
  • 1 tsp turmeric
  • 1 tsp dried minced onion
  • 1 tsp fenugreek
  • ½ tsp ground coriander
  • ¾ cup greek yogurt
  • sea salt
  • freshly ground black pepper
  • 3 tbsp olive oil
  • 1 tomato, cubed
  • ½ head iceberg lettuce, chopped
  • Pita bread

Instructions

  1. Combine all the spices, garlic, lemon juice and 1 tablespoon of olive.
  2. Generously salt and pepper.
  3. Work in the Greek yogurt.
  4. Add the cubed chicken thighs and onions and let it marinate overnight.
  5. Put 2 tablespoons of olive oil in a hot skillet.
  6. Add the chicken.
  7. When the chicken has browned, stir and place pitas on top.
  8. Once the pitas are warm, place a pita in a large square of tin foil and add the chicken.
  9. Top with lettuce and tomato.

White Sauce

  • 1 Cup Greek yogurt
  • 1 Cup mayonnaise
  • 1 Tbsp sugar
  • 1 Tbsp salt
  • 4 Tbsp white vinegar
  • 1.5 Tbsp. lemon juice (½ lemon)
  • 1 Tbsp. olive oil
  • 1 tsp dill (dry or fresh)

Red Sauce

  • 4 parts Harissa
  • 1 part Sriracha

Spam Musubi

From: Serious Eats

Of all the foods people associate with Hawaii, Spam musubi seems to be most popular, with echoes of lau lau, lomi lomi salmon, and kalua pig trailing just behind. I’ve heard the terms Spam sushi and Spam sandwiches, but, no, get it right: It’s Spam musubi.

Back home in Hawaii, musubis are found at every convenience shop on the islands, 7-11 included (and, I must say, their musubis are pretty darn good!). Musubis are sold in school cafeterias and right alongside butter mochi at local bake sales. Picnic? Someone’s mom is bound to make at least two dozen. Sleepover? Either dinner that night, or straight out of the fridge for breakfast.

Ingredients

  • 1 can Spam
  • 3 cups uncooked sushi rice
  • Soy sauce
  • Sugar
  • Nori sheets
  • Furikake or li hing mui
  • A musubi-maker

Tip: Before you begin, have all your ingredients at the ready so the Spam is at its hottest and crispest once it hits the rice.

Directions

  1. Slice the Spam into eight even pieces—or ten if you prefer, but I like my musubi on the meaty side, heavy on the Spam.
  2. Next, mix some soy sauce and sugar in a bowl. How much of each? It’s all up to you. Some like it more sweet, others like it salty. Start with equal amounts, and adjust to taste.
  3. OK. Now comes the awesome part. Place a sauté pan on a burner, turn up the heat, lay the slices of Spam down, and fry away.
  4. After 1 to 2 minutes, pour the soy sauce–sugar mix over the Spam—the mix will effortlessly soak into the crisping Spam pores, making it more salty (as if that were even possible) and a tad sweet as the sugar caramelizes.

  5. Keep frying it until you reach your desired level of crispness. Once done, transfer the Spam to a plate.
  6. Now, work quickly and have everything else laid out for assembly, otherwise the Spam will no longer be hot and crisp by the time the musubis are assembled. That would suck.
  7. OK. Ready? Cut the nori strips in half lengthwise, and lay the musubi-maker — everyone has one, right? 😉 — on the middle of the nori.

    Use the rice paddle to scoop a generous mound of rice into the mold. Use the musubi-maker handle to press down on the rice. Press hard. The last thing you want is floppy, unpressed rice—that just makes it difficult to eat.
  8. Shake a thin layer of furikake over the rice (right); lay a slice of Spam on top, and then shake on another layer of furikake. Some like to use li hing mui in place of furikake, which gives it a completely different taste, venturing into the realms of tangy-sweet, but I prefer the added crunch and hints of sesame from the furikake. Add one more layer of rice, and one final press.
  9. Press with all your might! You want this packed tight. The musubi is intended to be a portable treat. You should be able to stuff it in your backpack for lunch on the beach, take it on a hike in Manoa Valley, or a bike ride around the island. It is durable.
  10. Once you’ve given it a firm press, hold the handle down with one hand, and use the other to pull the mold upward, thus unleashing the musubi.
  11. Quickly wrap the nori around the rice (use a few grains of rice to stick the nori together at ends if necessary).
  12. Now hurry and monch, monch away before the nori goes soft!

Quite ‘ono, eh?

There shouldn’t be leftovers, but if so, wrap each musubi individually in plastic wrap, so you may pop them in the microwave whenever you desire. Or if you have extra time on your hands, I sometimes put the entire musubi in a pan, over low heat, and fry on all sides, crisping up the nori. There is no wrong way to eat Spam musubi.