Fish Tacos

Tips & Notes

The pickled onions, hot sauce and relish (minus the cilantro) can be made 1 day ahead. Cover and refrigerate until needed. Stir the chopped cilantro into the corn relish just before serving.

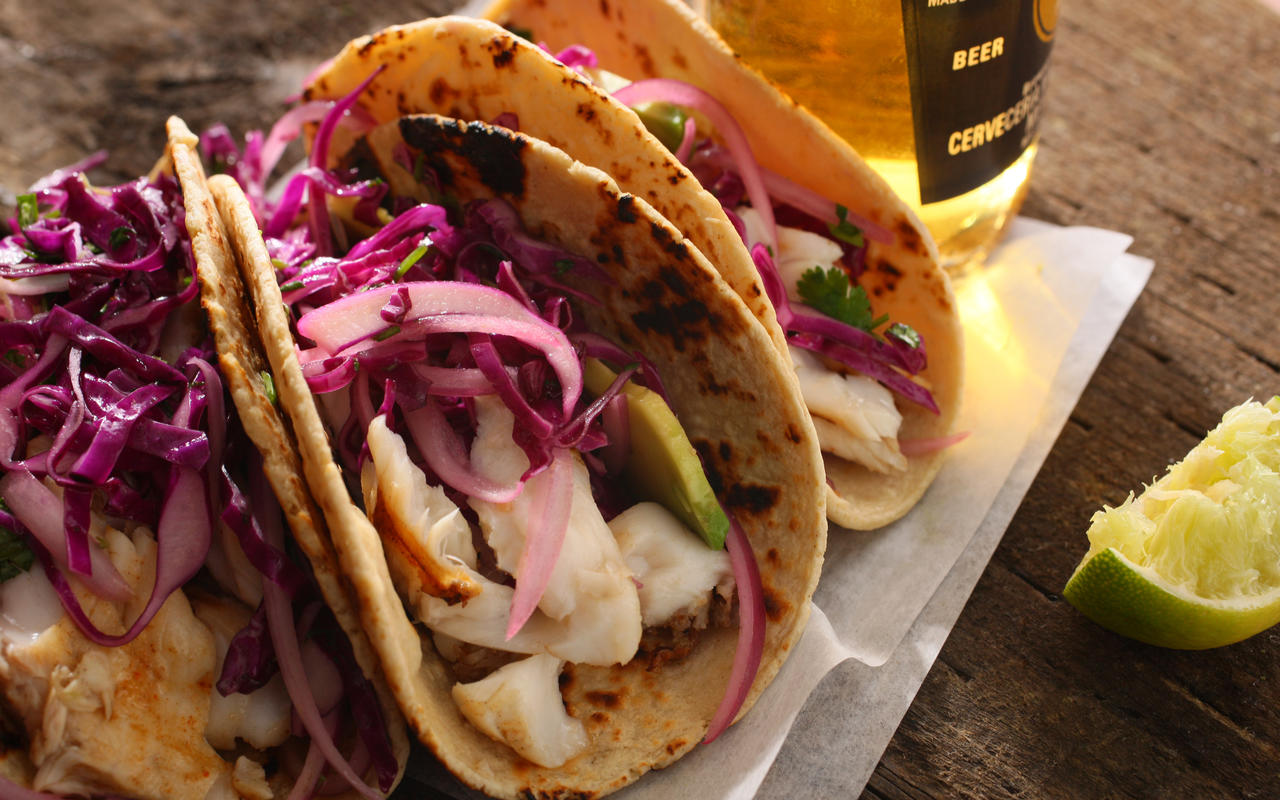
Make sure to inspect the fish. That is all I will say on this topic.

We started with hake, a nice firm white fish. We ended with half cod tilapia, half red snapper. Could you tell the difference? I couldn’t. Yum!

Ingredients

For the Quick Pickled Onion

  • 1 small red onion, peeled, halved and sliced into half moons
  • 2 limes, juice only

For the Hot Sauce

  • ½ cup mayonnaise
  • 2 tsp gochujang paste, or other hot sauce, to taste

For the Corn Relish

  • 1 cup drained canned corn
  • 1 fresh red chili, finely diced (de-seed if you don’t like too much heat)
  • 3 tbsp chopped fresh cilantro
  • salt, to taste

For the Fish Tacos

  • 4 skinless fillets of firm white fish, such as hake or haddock (2lb total), from the thicker loin end (we used cod tilapia and red snapper and we won’t speak of the hake ever again)
  • 1 tsp ground cumin
  • ½ tsp paprika
  • 1 tsp sea salt flakes or kosher salt
  • 1 garlic clove, peeled and finely grated or minced
  • 2 tbsp regular olive oil
  • 8 soft corn tortillas

For the Avocado

  • 2 ripe avocados
  • 1 lime, juice only

To Serve

  • salad leaves of your choice
  • 1–2 tbsp chopped fresh cilantro
  • 2 limes, cut into wedges

Method

  1. Preheat the oven to 425°F for the fish, and begin by preparing the sides for your tacos. Put the red onion slices into a bowl and cover with the lime juice. Stir with a fork to mix the onion well in the juice. Actually, if you can get this done ahead of time (up to 1 day), so much the better, but even 20 minutes is fine.
  2. Make the hot sauce by mixing together the mayonnaise and the gochujang paste (or other hot sauce) in a small bowl. Set aside.
  3. For the corn relish, put the canned corn into a bowl. Add the chili to the corn, along with the chopped cilantro and some salt to taste. Give it all a good stir, and set aside.
  4. Cut the fish fillets in half length-ways, so you have long fingers, and arrange in a shallow roasting tin. Mix together the cumin, paprika and salt, and sprinkle over the fish fillets. Mix the garlic and the oil in a small bowl. Drizzle the fish with the garlicky oil, and roast in the oven for 8–10 minutes, depending on the thickness of your fillets. Check to see if the fish is cooked through (though only just) before taking out of the oven.
  5. Once you’ve taken the fish out (though don’t let it get cold) turn off the oven and warm the tortillas in the fading heat. Meanwhile, peel, stone and slice the avocados, then spritz with the juice of the lime, ready to serve with the other accompaniments.
  6. Arrange the fish on a plate (lined with salad leaves, if so desired), sprinkle with some chopped fresh cilantro, and take to the table along with the warmed tortillas. If you don’t want to add any salad to the fish directly, you may want to put a bowl of shredded iceberg or some other crisp leaves nearby.
  7. Put the bowls of soused, but drained, red onions, the corn relish, hot sauce and a plate of sliced avocados on the table so that everyone can load their tortillas. A plate of lime wedges and a pile of napkins are both good ideas, too.

Overnight Brown-Butter Yeast-Raised Waffles with Lemon Chantilly

A post shared by Ashley Covelli (@bigflavors) on

Notes

I had made this recipe for Overnight Yeasted Waffles before and they we OK. Our standard waffle recipe is very good and has become such a favorite that all of the buzz about yeasted waffles didn’t really live up to the hype. They were perhaps only marginally better.

I found this new recipe for Overnight Brown-Butter Yeast-Raised Waffles and not only did it look easier but the thought of the golden brown butter flavoring made my mouth water. I’m happy at how it turned out, but it made much less than I thought it would! Pay attention to the serving size here, you may need to double or even triple it if you’re having guests.

The Lemon Chantilly was a suggested accompaniment and somewhat of an afterthought, but it turned out to be a stellar! I ended up macerating the lemons overnight since the waffle batter was also prepared the night before.

Yield

Makes two 8-inch square waffles or three 7-inch Belgian waffles

Timing

Active Time: About 10 minutes for waffles, 15 minutes for Chantilly & Lemon Syrup
Total Time: 12 to 18 hours

Ingredients

For the Waffles

  • 3 ounces unsalted butter (6 tablespoons; 85g)
  • 3/4 ounce sugar (4 teaspoons; 20g)
  • 1 teaspoon (4g) Diamond Crystal kosher salt (for table salt, use half as much by volume or use the same weight)
  • 10 ounces cold milk; any percentage will do (1 1/4 cup; 280g)
  • 1 large egg, cold
  • 7 1/2 ounces all-purpose flour (1 1/2 cups; 210g)
  • 1 1/4 teaspoons (4g) instant dry yeast (not rapid-rise)
  • 1/4 teaspoon baking soda
  • Safflower, vegetable, or canola oil for greasing the iron, if needed

For the Lemon Chantilly

  • 4 ounces (1/2 cup; 110g) heavy whipping cream, cold
  • 2 ounces (1/4 cup; 55g) fresh lemon syrup, cold
  • 1/8 ounce (1 tablespoon; 4g) freshly grated lemon zest

For the Lemon Syrup

  • 15 ounces (2 1/2 cups; 425g) “used” lemon rinds, from 6 medium lemons or 12 Meyer lemons
  • 7 ounces (1 cup; 200g) sugar

Instructions

For the Batter

  1. Melt butter in a 3-quart stainless steel saucier or saucepan, stirring and scraping with a heat-resistant spatula as it bubbles, and cook until golden brown.
  2. Remove from heat and immediately stir in sugar, salt, and milk, followed by egg.
  3. Sift in flour and stir until smooth.
  4. Add yeast and baking soda last, stirring to combine.
  5. Cover and refrigerate overnight, between 12 and 18 hours. The batter should be gooey and spongy at this point.

For the Lemon Syrup

  1. Cut each lemon into a few chunks and toss with sugar in a large glass, ceramic, or stainless steel mixing bowl. Cover tightly and let stand at room temperature, stirring once every 45 minutes or so, until sugar has completely dissolved, about 3 hours (or up to 12 if timing is an issue).
  2. Using a cheesecloth-lined or fine-mesh stainless steel strainer set over a nonreactive bowl, strain syrup.
  3. Working in batches, transfer rinds to a stainless steel potato ricer and squeeze to release any extra syrup, allowing it to pass through strainer into bowl; discard rinds. Refrigerate syrup for up to 3 months in a glass bottle or pint jar.

For the Lemon Chantilly

  1. In the bowl of a stand mixer fitted with a whisk attachment, combine cream, lemon syrup, and zest (if using).
  2. Whip at medium-high speed until fluffy and thick, about 5 minutes. Use immediately, or refrigerate for up to 1 week in an airtight container. For piping, re-whip the Chantilly after 24 hours.

For the Waffles

  1. Set waffle iron to medium and preheat until the indicator is ready; if using cast iron, brush lightly with safflower, vegetable, or canola oil.
  2. For an 8-inch square machine, scrape in half of the batter per batch. For a 7-inch Belgian machine, scrape in about one-third.
  3. Close lid and griddle until golden brown but still steaming, 5 to 7 minutes depending on the depth and heat of your machine. (Cooked waffles can be held on a rack in a 200°F oven while remaining batches are cooked.)
  4. Serve immediately with Lemon Chantilly and/or maple syrup.

The Best General Tso’s Chicken Recipe

Recipe by J. Kenji López-Alt, courtesy of Serious Eats

Notes

For this event my initial thought was to make Kung Pao chicken. I mentioned this to a friend of mine from Hong Kong who replied with, “WHAT? Of all the dishes, you’re going to make Kung Pao? Boo! I’m disappointed.” So with that, I felt I had to up my game.

This dish was time consuming, not very difficult, but I was quite pleased with the result feel that it was well worth the effort. Did it have anything to do with Chinese New Year? Probably not, it’s technically an American dish.

Apparently I did not follow the directions too closely with regards to the green onions, so we didn’t have any segments mixed in. That would have been nice. I suppose I’ll have to make this one all over again sometime. I doubled this recipe for the group.

Ingredients

For the Marinade

  • 1 egg white
  • 2 tablespoons dark soy sauce
  • 2 tablespoons Shaoxing wine (substitute with dry sherry or other dry cooking wine)
  • 2 tablespoons 80-proof vodka
  • 1/4 teaspoon baking soda
  • 3 tablespoons corn starch
  • 1 pound boneless, skinless chicken thighs, cut into 1/2- to 3/4-inch chunks

For the Dry Coating

  • 1/2 cup flour
  • 1/2 cup cornstarch
  • 1/2 teaspoon baking powder
  • 1/2 teaspoon kosher salt

For the Sauce

  • 3 tablespoons dark soy sauce
  • 2 tablespoons Shaoxing wine* (see note above)
  • 2 tablespoons Chinese rice vinegar or distilled white vinegar
  • 3 tablespoons homemade or store-bought low-sodium chicken stock
  • 4 tablespoons sugar
  • 1 teaspoon roasted sesame seed oil
  • 1 tablespoon corn starch
  • 2 teaspoons peanut, vegetable, or canola oil
  • 2 teaspoons minced garlic (about 2 medium cloves)
  • 2 teaspoons minced fresh ginger (about one 1-inch piece)
  • 2 teaspoons minced scallion bottoms (about 1 scallion), plus 6 to 8 scallions, white parts only, cut into 1-inch lengths
  • 8 small dried red Chinese or Arbol chilies

To Finish

  • 1 1/2 quarts peanut or other high smoke-point oil for deep frying
  • Steamed white rice for serving

Directions

For the Marinade

  1. Beat egg whites in a large bowl until broken down and lightly foamy.
  2. Add soy sauce, wine, and vodka and whisk to combine. Set aside half of marinade in a small bowl.
  3. Add baking soda and corn starch to the large bowl and whisk to combine.
  4. Add chicken to large bowl and turn with fingers to coat thoroughly.
  5. Cover with plastic wrap and set aside.

For the Dry Coat

  1. Combine flour, corn starch, baking powder, and 1/2 teaspoon salt in a large bowl. Whisk until homogeneous.
  2. Add reserved marinade and whisk until mixture has coarse, mealy clumps. Set aside.

For the Sauce

  1. Combine soy sauce, wine, vinegar, chicken stock, sugar, sesame seed oil, and cornstarch in a small bowl and stir with a fork until cornstarch is dissolved and no lumps remain. Set aside.
  2. Combine oil, garlic, ginger, minced scallions, and red chilies in a large skillet and place over medium heat. Cook, stirring, until vegetables are aromatic and soft, but not browned, about 3 minutes.
  3. Stir sauce mixture and add to skillet, making sure to scrape out and sugar or starch that has sunk to the bottom. Cook, stirring, until sauce boils and thickens, about 1 minute.
  4. Add scallion segments.
  5. Transfer sauce to a bowl to stop cooking, but don’t wipe out skillet.

To Finish

  1. Heat 1 1/2 quarts peanut, vegetable, or canola oil in a large wok or Dutch oven to 350°F and adjust flame to maintain temperature.
  2. Working one piece at a time, transfer chicken from marinade to dry coat mixture, tossing in between each addition to coat chicken. When all chicken is added to dry coat, toss with hands, pressing dry mixture onto chicken so it adheres, and making sure that every piece is coated thoroughly.
  3. Lift chicken one piece at a time, shake off excess coating, and carefully lower into hot oil (do not drop it). Once all chicken is added, cook, agitating with long chopsticks or a metal spider, and adjusting flame to maintain a temperature of 325 to 375°F, until chicken is cooked through and very crispy, about 4 minutes. Transfer chicken to a paper towel-lined bowl to drain.
  4. Add chicken to empty skillet and return sauce to skillet. Toss chicken, folding it with a rubber spatula until all pieces are thoroughly coated. Serve immediately with white rice.