Red bean Vegetarian Chili stuffed in Red Bell Pepper

  • Author: Cookie and Kate (for chili)
  • Prep Time: 20 mins
  • Cook Time: 40 mins
  • Total Time: 1 hour
  • Yield: 4 to 6 servings
  • Category: Chili
  • Cuisine: American

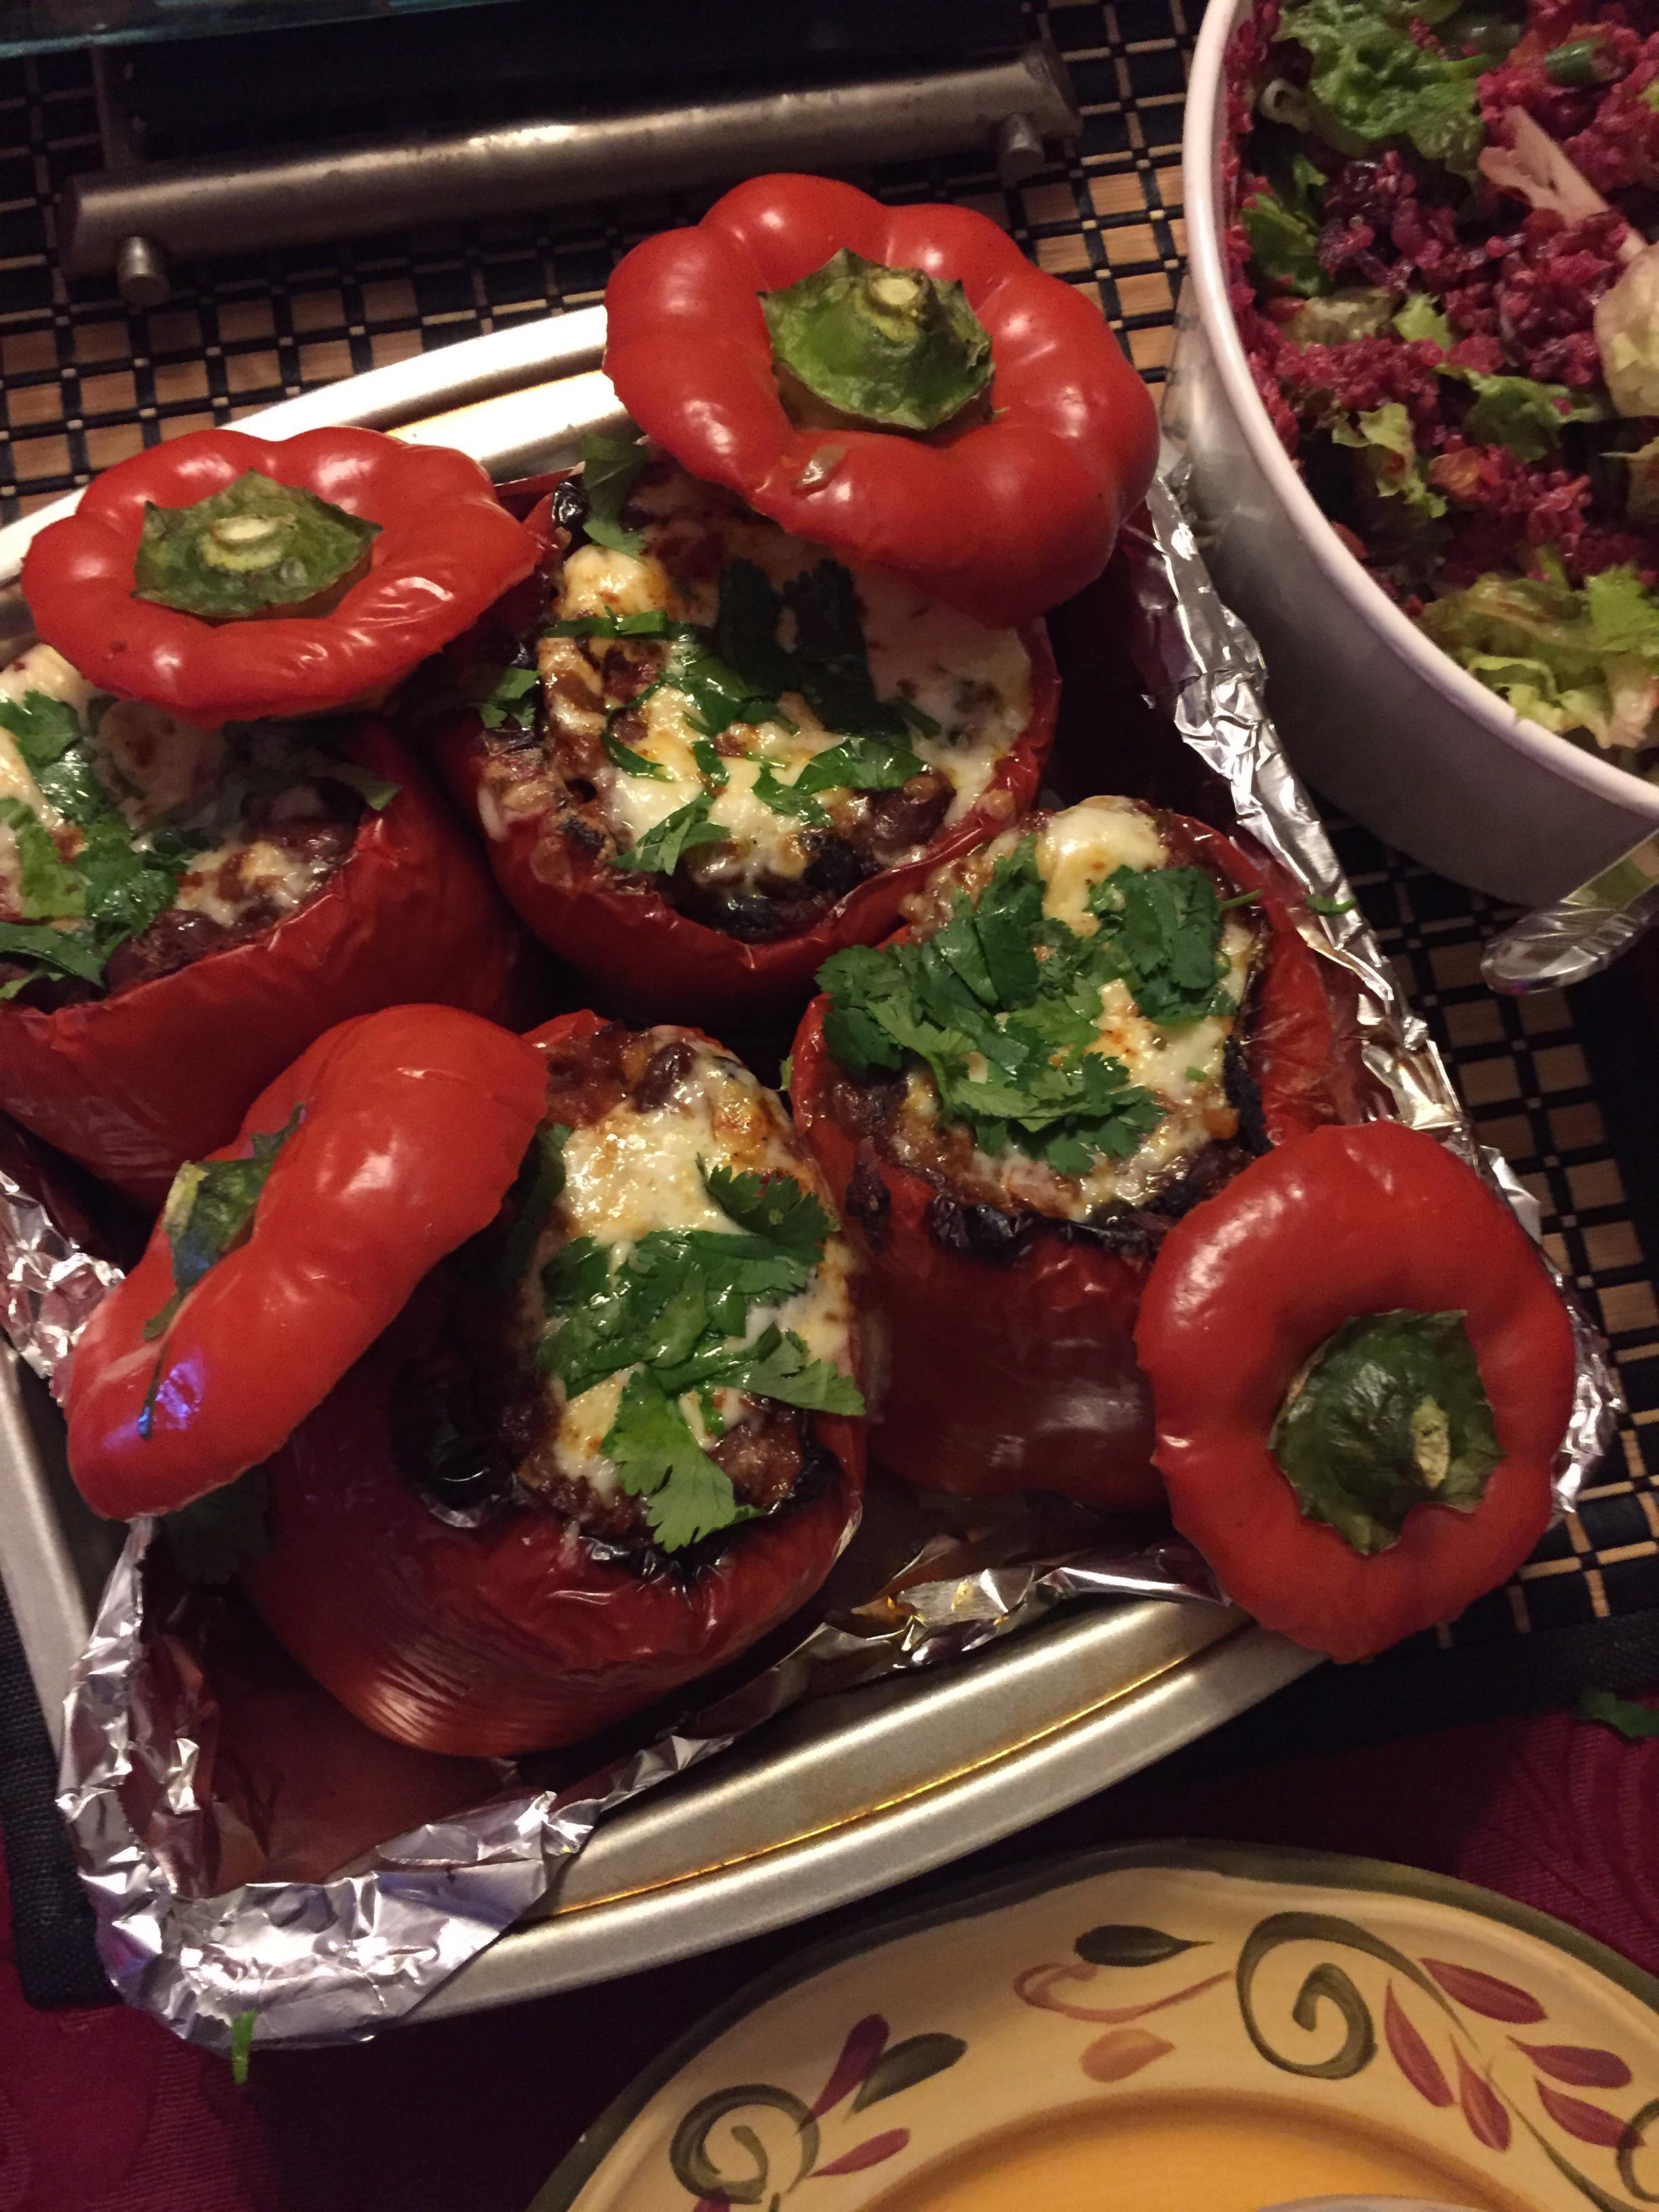
This chili probably made enough for 6 huge peppers, I doubled it and had a ton of extra.

The smoky, complex flavor of this simple vegetarian chili comes from basic pantry ingredients, vegetables and spices! It makes great leftovers, too. This chili recipe is gluten free as written (just be sure your garnishes are also gluten free), and vegan (unless you top it with dairy products like sour cream or cheese). Recipe yields 4 large or 6 moderate servings of chili.

INGREDIENTS

  • 2 tablespoons olive oil
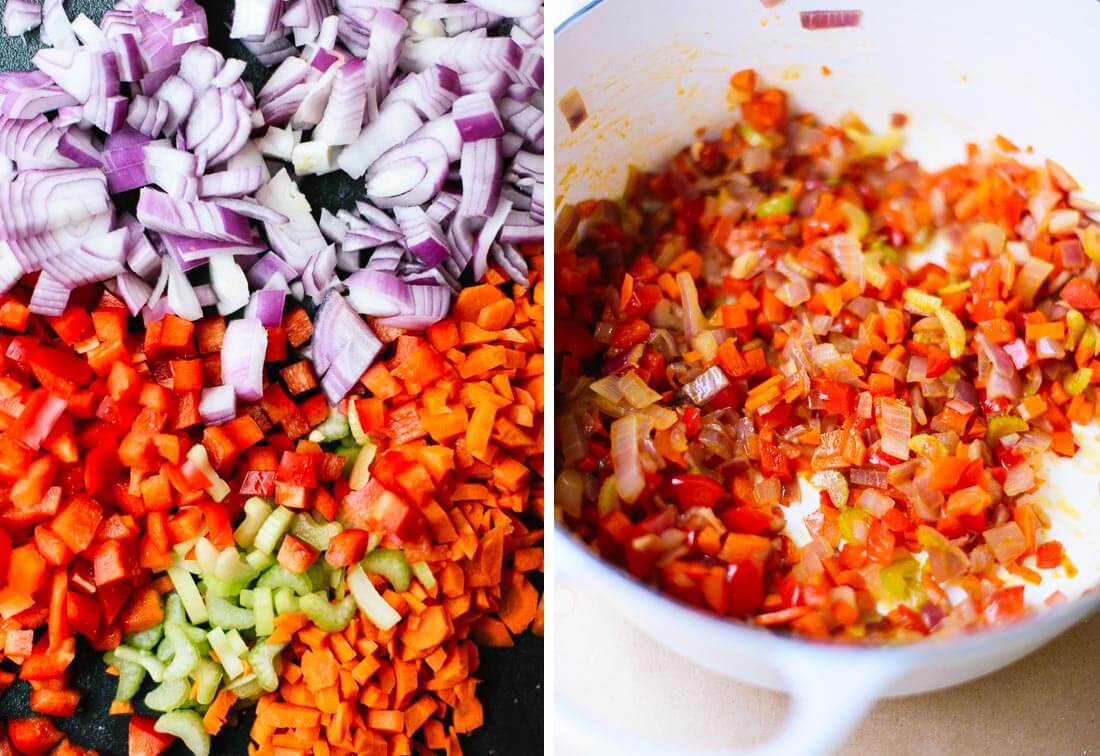
  • 1 medium red onion, chopped
  • 1 large red bell pepper, chopped
  • 2 medium carrots, chopped
  • 2 ribs celery, chopped
  • 1/2 teaspoon salt, divided
  • 4 cloves garlic, pressed or minced
  • 2 tablespoons chili powder*
  • 2 teaspoons ground cumin
  • 1 1/2 teaspoons smoked paprika*
  • 1 teaspoon dried oregano
  • 1 large can (28 ounces) or 2 small cans (15 ounces each) diced tomatoes**, with their juices
  • 2 cans (15 ounces each) black beans, rinsed and drained
  • 1 can (15 ounces) pinto beans, rinsed and drained (I used red beans instead)
  • 2 cups vegetable broth or water
  • 1 bay leaf
  • 2 tablespoons chopped fresh cilantro, plus more for garnishing
  • 1 to 2 teaspoons sherry vinegar or red wine vinegar or lime juice, to taste
  • Garnishes: chopped cilantro, sliced avocado, tortilla chips, sour cream or crème fraîche, grated cheddar cheese, etc.

INSTRUCTIONS

  1. In a large Dutch oven or heavy-bottomed pot over medium heat, warm the olive oil until shimmering. Add the chopped onion, bell pepper, carrot, celery and 1/4 teaspoon salt. Stir to combine and then cook, stirring occasionally, until the vegetables are tender and the onion is translucent, about 7 to 10 minutes.how to make vegetarian chili
  2. Add the garlic, chili powder, cumin, smoked paprika and oregano. Cook until fragrant while stirring constantly, about 1 minute.
  3. Add the diced tomatoes and their juices, the drained black beans and pinto beans, vegetable broth and bay leaf. Stir to combine and let the mixture come to a simmer. Continue cooking, stirring occasionally and reducing heat as necessary to maintain a gentle simmer, for 30 minutes. Remove the chili from heat.
  4. For the best texture and flavor, transfer 1 1/2 cups of the chili to a blender and blend until smooth, then pour the blended mixture back into the pot. (Or, you can blend the chili briefly with an immersion blender, or mash the chili with a potato masher until it reaches a thicker, more chili-like consistency.)
  5. Add the chopped cilantro, stir to blend, and then mix in the vinegar, to taste. Add salt to taste, too—I added 1/4 teaspoon more at this point. Divide the mixture into individual bowls and serve with garnishes of your choice. This chili will keep well in the refrigerator for about 4 days (I haven’t tried, but I bet it would freeze well, too).

The best vegetarian chili - so easy to make with basic ingredients! cookieandkate.com

NOTES

Recipes consulted during the making of this recipe: vegetarian chili with winter vegetables (The New York Times), vegetarian chili (Saveur) and winter vegetable chili (Food and Wine). 
This is very good chili

  1. Slice the tops off peppers and remove seeds. and white pith
    Slice thin layer off the bottom to help them stand up straight. (if necessary)
    Scoop chili mixture into peppers.
    Stand peppers in a glass baking dish. replace top on peppers
  2. Cover with foil and bake at 375 degrees for 40 minutes.
  3. Remove foil and sprinkle cheese (I used pepper jack cheese) then bake for another 5-10 minutes until cheese is starting to brown
  4. Sprinkle with cilantro


Oyakodon (Chicken & Egg Bowl)

Oyakodon (Chicken & Egg Bowl) 親子丼 | Easy Japanese Recipes at JustOneCookbook.com
Print
Prep Time 15 mins
Cook Time 15 mins
Total Time 30 mins
Course: Main Course
Servings: 2
Ingredients
  • 2 boneless skinless chicken thighs
  • ½ onion
  • 2 large eggs
Seasonings (ample amount – do not need to use all): (I used all)
To serve:
Instructions
  1. Gather all the ingredients.
    Oyakodon Ingredients
  2. Combine dashi, mirin, sake, soy sauce in a bowl or a liquid measuring cup.
    Oyakodon 1
  3. Add sugar and mix all together until sugar is dissolved.
    Oyakodon 2
  4. Thinly slice the onion and chop mitsuba (or green onion). Beat one egg in a small bowl (you will need to beat another egg when you work on the second batch).
    Oyakodon 3
  5. Slice the chicken thigh diagonally and cut into 1.5″ (4 cm) pieces. I recommend using “sogigiri” cutting technique so the chicken will be equal thickness and create more surface area for fast cooking.
    Oyakodon 4
  6. We make one serving at a time using a small frying pan. Divide all the ingredients in half. Add half of the onion in a single layer.  Pour roughly 1/3 to ½ of the seasonings mixture (depending on the size of your frying pan, the amount may vary). You will need just enough sauce to cover the onion and chicken.
    Oyakodon 5
  7. Add half of the chicken on top of the onion. Make sure the onion and chicken are evenly distributed.  Turn on the heat to medium heat and bring to a boil.

    Oyakodon 6
  8. Once boiling, lower the heat to medium low heat. Skim off any foam or scum if you see any. Cover and cook for about 5 minutes or until chicken is no longer pink.

    Oyakodon 7
  9. Slowly and evenly drizzle the beaten egg over the chicken and onion. Cook covered on medium low heat until the egg is done to your liking. Usually Oyakdon in Japan is served with almost set but runny egg.

    Oyakodon 8
  10. Add the mitsuba (or green onion) right before removing from the heat. Pour the chicken and egg on top of steamed rice and drizzle desired amount of remaining sauce.
    Oyakodon 9


Jerk Cauliflower

http://divaliciousrecipes.com/2016/09/14/jerk-cauliflower/
Serves 4
Ingredients
  1. 1 head cauliflower, cut into florets
Marinade
  1. 5 scallions/spring onions
  2. 1 tablespoon thyme, chopped
  3. 1/2 teaspoon salt
  4. 1/2 teaspoon black pepper
  5. 1 1/2 teaspoon ground allspice
  6. 1 teaspoon marjoram
  7. 1 tablespoon fresh parsley
  8. 2 scotch bonnet peppers
  9. 2 tablespoon lime juice
  10. 2 tablespoon olive oil
  11. 1/4 cup vinegar
  12. ¼ teaspoon ground cloves
  13. ¼ teaspoon cinnamon
  14. 1 onion, peeled and chopped
  15. 2 cloves garlic
  16. 2 tablespoons water
Instructions
  1. Chop the spring onions, peppers, onion and garlic.
  2. Place in a food blender and add the remaining marinade ingredients.
  3. Puree until you have a smooth consistency.
  4. Place the cauliflower florets in a bowl and add about a quarter of the marinade to the bowl. Mix well until the cauliflower is coated.
  5. Cover the bowl and place in the fridge for at least 2 hours.
  6. Preheat the oven to 200C/400F degrees.
  7. Arrange the cauliflower florets on a baking tray and bake for 40 minutes, turning over half way through cooking.
  8. Eat and enjoy!
Notes
  1. Nutritional Info per quarter – 114 Calories, 7g Fat, 3g Protein, 11g Total Carbs, 4g Fibre, 7g Net Carbs

I went to a farmers market and they had huge orange cauliflower so I decided to use that for this month’s theme..

cauliflower one.png

The recipe calls for preparing in advance and letting it sit in a marinate for at least 2 hours (for me it was closer to 7 hours) .

I used a lot more of the jerk/marinade than the recipe called for (probably twice as much). I’m not sure if that’s partly why the final dish was very spicy.

I couldn’t find scotch bonnets so I just habaneros instead.

habanero.png

This isn’t a very precise recipe. I prefer recipes to give weight measurements for ingredients. For example it says you need I need 5 green onions. Depending on where you get them around here they be about the size of a straw or about ½ the size of a leek.

Onions – what kind? What size? Also, I used all fresh herbs but it wasn’t clear if that’s what I was supposed to do.

(I think this was the first time I’ve cooked with fresh marjoram:
marjaram.png

I thought it needed a little more salt. Overall for me I would give it 7 out of 10. Next time I may cook it at a lower temp for longer.

cauliflower row.JPG